A successful inspection is much like any other endeavor; it begins with good planning. House construction most people assume begins with the foundation. It does not actually, it begins with a set of architect’s plans that get sent to the various contractors and crew members who work on the job. Just as a set of plans are the seed of a new construction project, CloudVisit Remote Inspection software will be of most benefit if used in conjunction with a well thought out inspection checklist. A checklist will be the articulated reflection to the crewmember of the team leader’s idea on how to conduct a proper job and inspection.
For a well-designed checklist, the first thing a team leader needs is a plan. One should visualize the elements from a job site or facility that require inspection. If your inspection requires reviewing a completed installation project, it is a good idea to review the work scope or contract to identify the items that need final review.
One thing that can be easily forgotten during an inspection is tracking that all certifications and work permits are in place. A visual survey of these documents is an ideal starting place to begin your virtual inspection. CloudVisit Remote Inspection software even allows you to store copies of the documents within the system.
This is then followed by a list of all major areas that require review. Each of these areas can be considered a subproject and you should itemize any specific deliverables, as much as possible. Some of CloudVisit’s customers go so far as to inspect the integrity of every nut and bolt of an install. The level of detail of your inspection is ultimately up to you.
One should not worry if the steps are incomplete when you create your checklist initially. CloudVisit’s remote visual inspection software was built to allow for the easy reorganization of subprojects within a checklist. Users of its software will be able to move, add and delete rows within the checklist instantly. They also have the option of relabeling rows as necessary. But as in all endeavors, a well thought out plan will result in a successful project that will have few surprises, if any, for yourself or the members of the crew.
Creating the Remote Inspection Plan Checklist
Once the plan is designed the next thing to do is to convert it into a checklist. CloudVisit’s Inspection software will import data from a Microsoft Excel spreadsheet. So, the next step in building the checklist is to determine the items requiring review within a spreadsheet format. Each item that needs review in your inspection plan will require its own row within the spreadsheet.
The content within the spreadsheet checklist rows, are further delineated within a column structure. CloudVisit Remote Inspection software is flexible enough to allow you to use spreadsheet document with extra column content. Therefore, if your company already has an inspection spreadsheet there is no need to reinvent the wheel. You will simply need to map the column content that you want to import into your inspection session. For example, you could have a spreadsheet with the following columns:
| A | B | C | D | E | F | G | H | I |
| Label | Sector | Category | Description | Category ID | Specifications
(Extended Description) |
Status | Comments | Hyperlinks |
Figure A
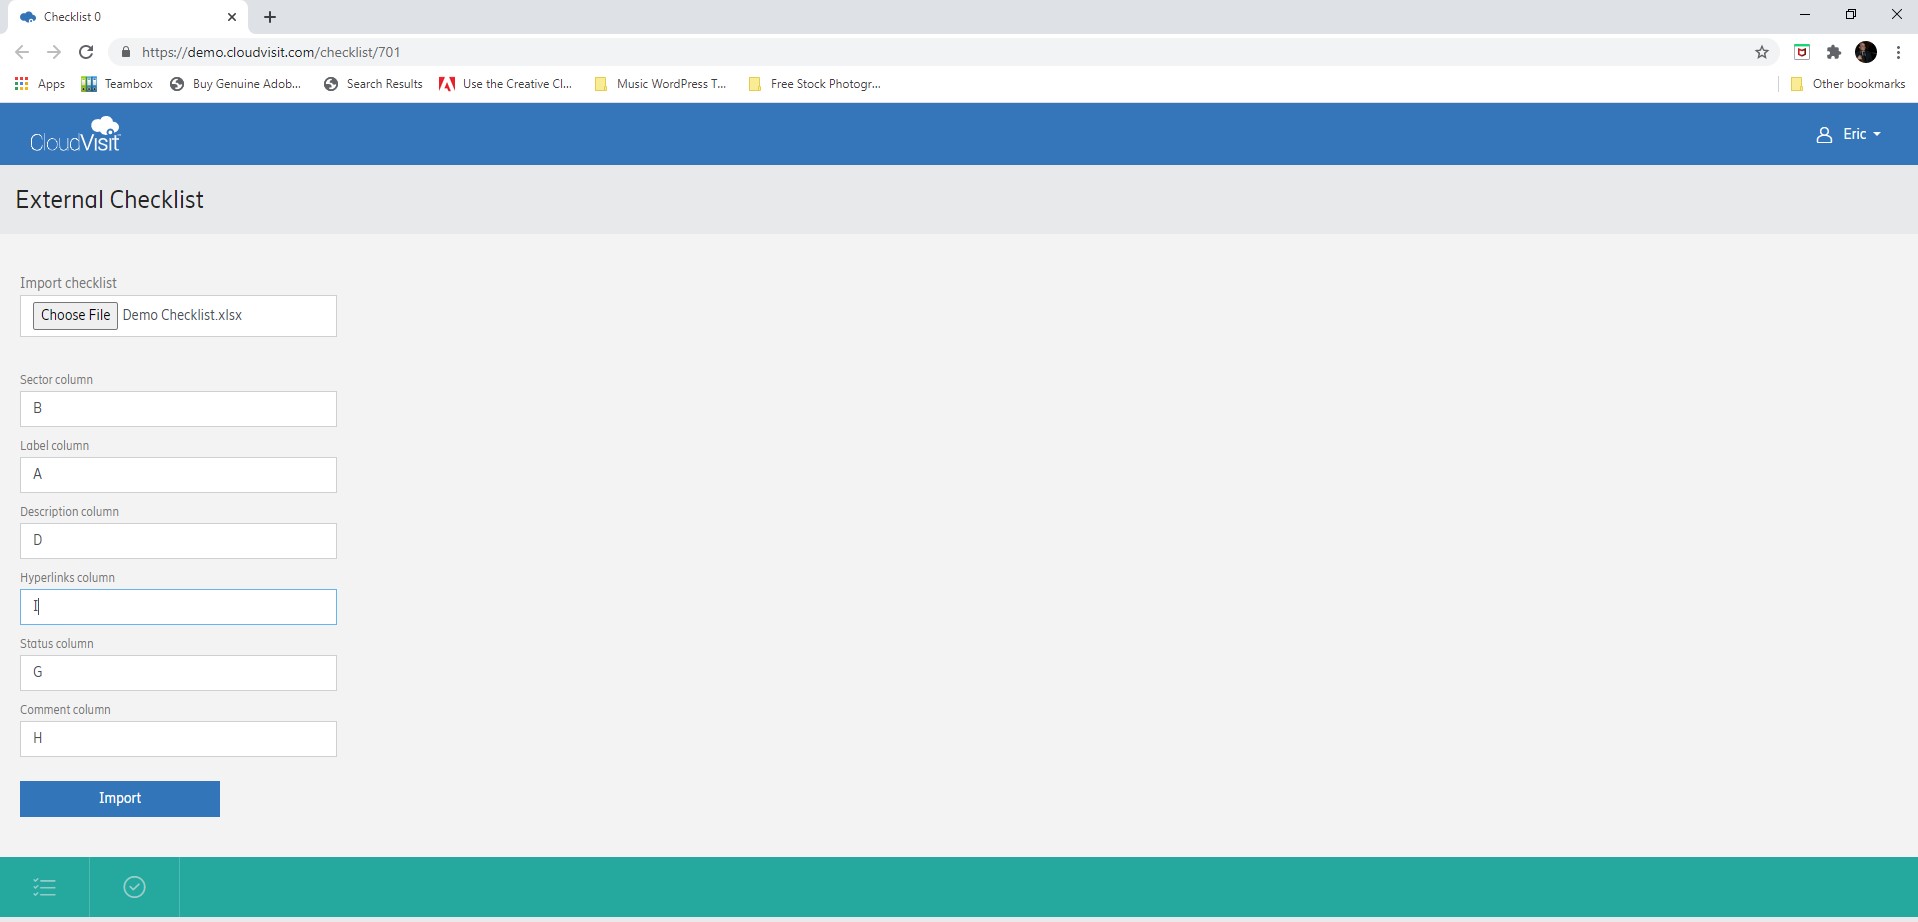
CloudVisit Remote Inspection software allows you to import up to 6 columns of data into your inspection session’s checklist. However, you can map any available columns upon checklist import so that the most important data is available within the virtual inspection session.
For example, if you cared the most about the data contained in Label, Sector, Description, Status, Comments and Hyperlinks columns within Figure A, to successfully import your data, the following columns must be mapped correctly within Figure B:
| A | B | D | G | H | I |
| Label | Sector | Description | Status | Comments | Hyperlinks |
Figure B

The various columns within the checklist have dedicated functionality to assist you with your remote inspection. The following table provides further detail on each column’s intended use:
| CloudVisit Remote Inspection software Checklist Functionality | ||
| CloudVisit Column Order |
Default Column Name | Description |
| A | Sector | The Sector column is intended to delineate the location of the item within the job site. For example, if you were inspecting a swimming pool the sector could be broken down into categories like, Cabana, Pool Filter, Feeder, Drain, Pool Cover. It is sometimes useful to sort the checklist by sector within the remote inspection so that you can inspect items in one location all at the same time. |
| B | Label | The labels column is intended to provide a brief name of the deliverable items within the inspection plan. This would be the logical place to begin to divide and outline the items to review during the remote inspection. This is the only field that requires content upon checklist import. When mobile users upload files into this column, the files are automatically renamed with the row label as a prefix. This makes it easier for an inspector to identify and review the files within the session file folder. Therefore, it is advisable to keep this row label text short. |
| C | Description | The Description column is intended to provide further detail about the item that requires review. It can provide helpful information to the inspector for what details to review. It can also be beneficial for crew members to review this checklist content prior to the inspection, so they are sure to be in compliance with all requirements beforehand. |
| D | Hyperlinks | The hyperlinks column allows you to share documentation with customers, suppliers, and regulators. It is possible to link to files listed in the session file folder, or even to pages listed on other websites. Inspectors can also take still image captures of video feeds and annotate them. The annotated photo can then be shared via hyperlink with the crew member to better illustrate required corrective action. |
| E | Status | The row status column contains a dropdown menu within the checklist. The inspector defines row statuses with passing and failing status values. Within Continuous Capture session types, the inspector can specify the exact terminology of the status values. Some common status values include pass, fail, Not Applicable, Observable, Unobservable, Corrected, Accepted, or Rejected. The status column allows you to easily determine any items that were uncompliant with requirements. |
| F | Comments | The comments column is intended to allow the inspector to write out brief details about the observations that are made during the inspection. For example, the remote inspector can mention that there was pre=existing vandalism on a job site, or why a deliverable item has been listed as deficient in the punch list. |
This checklist design has been applied to thousands of projects conducted throughout the world in a variety of industries. This functionality is generic enough for great versatility, and can be used for almost any non-destructive testing (NDT) or visual inspection. It is also flexible enough to allow for a high level of specificity when imported with sufficient detail.
Once your inspection plan has been defined within the spreadsheet format and imported into CloudVisit Remote Inspection software, you have completed the first stage of your remote inspection. The session can then be conducted successfully with the assurance that every item on the inspection plan is reviewed.
This inspection plan format is highly adaptable and can be reused as a template with slight modifications for other future projects as necessary. If you are interested in seeing CloudVist’s Remote Inspection software’s checklist in action, schedule a demo today!

 Language:


